Standalone emulators
The one-press catalog, moving between published builds, and registering an emulator yourself.
Back to the README.
Installing an emulator
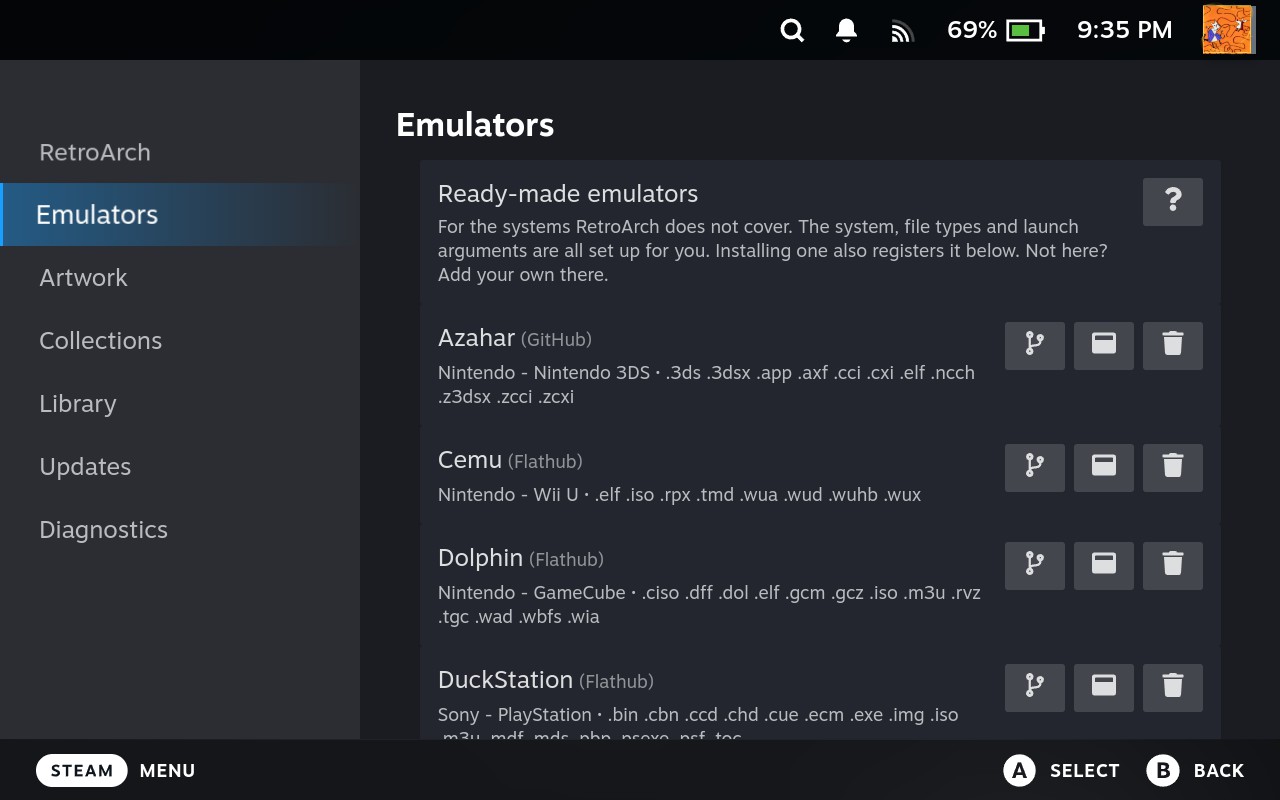
The Emulators tab lists emulators for the systems RetroArch doesn't cover. Press install and you get the emulator downloaded and set up — the system, the file types it accepts and its launch arguments all filled in.
| Emulator | System | Installed from |
|---|---|---|
| Dolphin | GameCube, Wii | Flathub — org.DolphinEmu.dolphin-emu |
| PCSX2 | PlayStation 2 | Flathub — net.pcsx2.PCSX2 |
| RPCS3 | PlayStation 3 | GitHub — RPCS3/rpcs3-binaries-linux |
| shadPS4 | PlayStation 4 | Flathub — net.shadps4.shadPS4 |
| DuckStation | PlayStation 1 | Flathub — org.duckstation.DuckStation |
| PPSSPP | PSP | Flathub — org.ppsspp.PPSSPP |
| Vita3K | PS Vita | GitHub — Vita3K/Vita3K-builds |
| Ryujinx | Switch | Flathub — io.github.ryubing.Ryujinx |
| Cemu | Wii U | Flathub — info.cemu.Cemu |
| Azahar | 3DS | GitHub — azahar-emu/azahar |
| xemu | Xbox | Flathub — app.xemu.xemu |
| Xenia Canary | Xbox 360 | GitHub — xenia-canary/xenia-canary |
| Supermodel | Sega Model 3 arcade | Flathub — com.supermodel3.Supermodel |
| BigPEmu | Atari Jaguar | Direct — www.richwhitehouse.com/jaguar |
Nothing here is a mirror or a repack. The application id or repository above is where the build comes from, and following one takes you to the publisher's own page. That's the whole of what this plugin adds: it downloads what those projects publish and fills in the system, file types and launch arguments.
Most come from Flathub and install for your user, so nothing asks for a
password. RPCS3, Azahar, Vita3K and Xenia Canary publish no Flatpak and get
downloaded from their own releases into ~/deckyemu/emulators. The panel says
which is which in brackets after the name, because the two behave differently
when something goes wrong and only one of them has builds you can move between.
The one marked (Direct)
BigPEmu plays the Atari Jaguar, and it's the only way to play the system well — RetroArch's Virtual Jaguar core leaves games that don't run at all.
Its author publishes no flatpak and uses no release page, so the plugin reads the same update feed BigPEmu's own Check for Updates reads, and downloads the build that feed names.
That feed states a checksum for the file, which no other entry here does. So this is the one download the plugin can check against a number the publisher published.
It moves between builds like the others, with the list coming from an unusual place: the release notes inside the build itself, which name every version back to 1.00. Going back to one needs no network beyond the download, and each build is checked to be still published before you're offered it.
One difference worth knowing: an older build can't be checked against a checksum. The feed states one for the current version only, so a fresh install is verified and a rollback isn't.
What installing also sets up
Several emulators aren't playable as they ship — a keyboard is bound instead of a controller, or they start in a window. So installing one also writes a controller configuration and turns fullscreen on. Those values aren't guesses; where they came from is under Credits.
The same pass turns off whatever an emulator draws over the game. On a desktop a menu bar that slides in, a notification in the corner or a mouse pointer are harmless. On a handheld the game is the only thing on screen and you have no pointer to dismiss any of it with. xemu is the clearest case — its menu bar, its notifications and its cursor all get switched off on install.
BIOS, keys and firmware
Installing the emulator isn't always enough to play. Some systems need BIOS files, keys or firmware that are yours to dump and that this plugin will never download. PCSX2 and xemu won't boot without them. The install prompt tells you which ones before it starts.
A BIOS and firmware section appears under the emulator list once you've installed something that needs files. Send them from another device and they're recognised by name and put where the emulator reads them. Press Install and that's the whole step.
Anything already in place is never overwritten. A dump you put there by hand is left alone, and only a placeholder the emulator wrote for you to fill in gets replaced.
Keys are not a decrypter. For the 3DS in particular, aes_keys.txt opens
installed eShop titles and DLC. It does nothing for a cartridge dump. Azahar
refuses an encrypted dump outright — it decrypts nothing — so a .3ds has to be
decrypted before you add it, with GodMode9 on a console or a decryption tool on
a PC.
A filename containing "Decrypted" is not evidence. The header is, and a mislabelled file is common enough to be worth suspecting first when a 3DS game won't start.
Installing moves the file rather than copying it, so ~/deckyemu/firmware
doesn't accumulate a second copy of every BIOS you've ever sent — a PS3 firmware
update is a couple of hundred megabytes.
So after installing, your transfer folder is empty. Your only copy is the one the emulator is now using, and removing it from that emulator deletes it.
A file one emulator has gets shared with the others. Adding a game to an emulator, switching a game to it, installing a BIOS another emulator in use wants, or just starting the plugin all share the file straight away — the same file between the two rather than a copy — so the row reads In place.
Removing it from one leaves the other's copy, and the remove dialog says so. It isn't shared back on its own: the row reads Also on the Deck for … with an Install button to take it again.
RetroArch cores are listed too, under RetroArch, from what each core declares it reads, for the cores your games run on.
A file a core needs, or one already in place, gets a row. Files a core can use but doesn't need are listed together on one Optional files line at the top of the group, with a send button and an info button listing them all and the cores that read each. One you send turns into a row of its own.
Files go into RetroArch's own system folder, wherever retroarch.cfg points it
— which isn't always the default — under the exact name the core opens, so a
SCPH5501.BIN sent from a phone lands as scph5501.bin.
A dump under any other name is recognised by its contents too, from the checksum list libretro publishes, which the plugin downloads and keeps for a month. Offline, only the name counts. A file with the right name but contents the list doesn't know is flagged on its row, and installing it asks you first; it's never shared to another emulator on its own. It isn't refused outright, because the list doesn't include every legitimate file.
Most cores run without any of them. When a core says it can't, adding a game for it warns you the same way PCSX2 does.
Three can't be installed for you, because the emulator unpacks them itself: RPCS3's
PS3UPDAT.PUP, a Switch firmware archive, and xemu's BIOS files. They're still detected, and the row tells you the one step left.
Unpacking a PS4 package
A PlayStation 4 game arrives as a .pkg, and shadPS4 can't unpack one — the
code that used to do it was taken out of the emulator and published separately.
So the first time you add a .pkg, the plugin downloads a small command-line
tool to do it: the PS4 package extractor from
shadPS4Plus, GPL-2.0, taken from
that project's own release page.
It's fetched then rather than with the emulator, because most people never add a
.pkg at all. It lands in ~/deckyemu/tools/, kept apart from
~/deckyemu/emulators/ on purpose — it plays nothing, it turns a .pkg into a
folder shadPS4 can run — and it isn't listed as an emulator anywhere.
Reinstalling the plugin doesn't delete it.
It's descended from shadPS4's own extractor, which is why it was chosen over anything else that reads the format: what comes out is what shadPS4 expects, rather than another project's reading of the same file.
The other two consoles need nothing extra. RPCS3 unpacks its own packages, and
Vita3K installs from a .pkg directly once it has the licence key.
Sending a PS3 licence on its own
A .rap next to its .pkg goes in when the game is unpacked, whatever it's
called.
Sending one later, for a game already in RPCS3? Its row in the transfer list has
Install. A .rap named for its content id, like
UP0000-ABCD12345_00-0000000000000001.rap, gets put where RPCS3 reads it. Any
other name says nothing about which game it unlocks, so it's refused with a note
to send it next to its .pkg.
A Vita .zrif key has nothing to go into on its own — Vita3K reads it only
while it installs the game — so its row tells you that instead.
Getting to the emulator's own menu
DuckStation and PCSX2 both ship every hotkey bound to a key, and both put Change Disc in a menu a controller can drive once it's open.
The combo is Select + Start, the same one RetroArch uses — see getting into RetroArch's menu. It opens DuckStation's pause menu, where save states, settings, quitting and Change Disc live.
It's written for you when DuckStation is set up. Every hotkey DuckStation ships
is bound to a key — Escape for the pause menu — and on a Deck in Game Mode
you have no keyboard to press, so without this its menu can't be reached at all.
Dolphin, the other emulator here with multi-disc games, has no menu worth reaching this way. Its Change Disc opens a file browser rather than listing a playlist's discs, so it's set to change disc by itself instead.
Multi-disc games usually change disc by themselves. DuckStation is set to switch to the next disc when the game stops the CD-ROM motor, which is what a game does when it asks you to insert the next one. Upstream is clear this doesn't work for every game, so the combo above is your way through when it doesn't fire. See multi-disc games.
Fixes
Some emulators have bugs this plugin can correct. Those corrections appear as Fixes when you edit an emulator on the Emulators tab. Motion controls, below, is the only one today.
A fix is temporary, by definition. Every one names the upstream bug report that will make it unnecessary, and it exists to be deleted rather than kept.
This isn't where an emulator is configured. Settings that are simply how an emulator has to run on a Deck are applied for you and never appear here.
They all start switched off, because each one costs something. The ❓ next to a fix tells you what it fixes and what that costs, which is the whole basis for deciding. The switch always works, both ways, whatever else is going on.
Set them per emulator, or per game. The emulator's switch is the default for its games, and editing any game shows you the same fixes. While the link next to a fix is joined, the game follows the emulator and the switch is greyed out, showing the emulator's setting. Break the link and you can set it for that game alone. Join it again to hand the fix back to the emulator.
When a fix stops doing its job
You get told, and only then:
- "The emulator does this itself now. You can switch this off." — said only once the build you have actually contains the fix, never merely because the plugin was updated. If yours is older, nothing is said and the fix goes on working.
- "This build of the emulator would not take it, so it is not running." — for a fix applied to the emulator's own files, when a build has changed too much to accept one. Nothing is altered; the emulator runs exactly as downloaded.
You don't have to go looking for either. Both appear under the emulator on the Emulators tab, and a game that starts with one shows you a dialog as it launches — once per emulator, never while a fix is on and working. The dialog only tells you; the switch lives on the Emulators tab and nowhere else.
Motion controls
Five consoles here had a motion sensor and games that expect it: the PS Vita, the PS4, whose DualShock has a gyroscope, the Switch, the Wii U, whose GamePad had one, and the 3DS, which used its gyro for aiming.
Your Deck has one too, and it can drive all five. But the PS Vita and the PS4 pay for it, so there it's off until you ask for it.
Switch, Wii U and 3DS: it just works
Ryujinx, Cemu and Azahar can all take motion over a small local connection instead of reading the controller, so your Steam layout is untouched and your back buttons keep working.
Nothing to switch on and no per-game choice to make. The piece that provides it is fetched with the emulator, runs only while a game is open, and stops when you close it.
A Tools section on the Emulators tab shows you where it stands: the piece that provides motion, listed by name with the project it came from, whether it's installed, and how big it is. You can remove it and download it again from that row. The emulator's own row says motion ready too.
Says it's waiting to retry? That's GitHub limiting how often one address may ask. It clears on its own.
Set up the emulator's controller yourself? Your settings are kept and never overwritten — which means the emulator isn't pointed at the motion server and gyro won't work. The row says so rather than claiming it's ready.
To use it, add a motion source to the emulator's own controller settings, all at
127.0.0.1 port 26760:
| Emulator | What to set |
|---|---|
| Cemu | A second controller with the DSUController API |
| Ryujinx | Motion backend set to CemuHook |
| Azahar | Motion device set to the UDP engine |
Tools are a separate list from BIOS and firmware on purpose. Everything under BIOS and firmware is yours, and none of it is ever downloaded. Everything under Tools is fetched from the project that publishes it, and each row says which. Installing Ryujinx or Cemu tells you the motion server is coming before it's downloaded.
My game still ignores the Deck's tilt
Check the game's own settings before anything else. Several ship with motion turned off, or with a motion sensitivity slider sitting at zero, and won't mention it anywhere.
PS Vita and PS4: it costs something
Turning it on. Edit the emulator on the Emulators tab and switch on Motion controls under Fixes — see Fixes above for how those work. Vita3K and shadPS4 are set separately. Ryujinx and Cemu have no such switch, because they have nothing to trade.
Per game, if one differs. That's the common shape of a PS4 library: one game that wants motion and twenty that would rather keep their back buttons. Set the emulator off and that one game on.
What it costs. To reach the sensor the emulator has to read your Deck's controller directly instead of going through Steam Input. Your Steam layout then stops shaping it:
- Remapped buttons, stick curves and the back buttons do nothing.
- The STEAM button opens the Steam menu and nothing else.
- Sticks, triggers and face buttons behave as always, and the right trackpad still works as a pointer.
That applies to every game of that system, including the ones with no motion at all. It can't be paid per game. So a PS4 library with one motion game would lose its back buttons everywhere to gain a gyro in one place, which is a choice worth making deliberately rather than inheriting.
Your games get a controller layout called "Gamepad with Gyro (DeckyEmu)" while motion is on, because Steam switches your Deck's sensor off unless the running game's layout uses the gyro. It's Valve's own gyro layout with the gyro sent to a stick rather than the mouse, since both emulators read the mouse pointer as a touch surface.
Switching motion off puts those games back on an ordinary gamepad layout — which matters, because a gyro layout left in place would send your tilting to the right stick and drift the camera.
Picked a layout for a game yourself? Yours is kept, in both directions. It's never replaced when motion goes on, and never taken away when it goes off. So if motion doesn't work in one game, that's usually why — open its Controller Settings and choose Gamepad with Gyro (DeckyEmu).
Binding the gyro yourself works too, with one catch. A behaviour that activates only while you hold or touch something — Gyro To Mouse defaults to right-stick touch — leaves the sensor powered only while you do, so motion works under your thumb and looks broken otherwise. Pick one that's always on, such as Gyro To Joystick Camera.
Vita3K saying its build came from a source no longer used? Update it once from the Emulators tab. An emulator already on your Deck is never re-downloaded on its own, so an older install stays put until you say. You're told once as a game starts, and the Emulators tab keeps saying it until you do.
The two fixes underneath
Neither console works on a Deck without a correction, and they're different ones.
Vita3K gets four bytes changed in the copy on your Deck. Motion is broken in current builds, where the bundled SDL reports your Deck's sensor timings in the wrong unit and the maths comes out a thousand times too small. Vita3K builds SDL into itself, so unlike shadPS4 there's nothing to correct from outside — the change has to be in the file.
The emulator is still the authors' own build, downloaded from Vita3K/Vita3K-builds and updated like any other, so you can be told which build you have and offered an older one.
The corrected copy is made when it installs and kept next to the original, and turning the switch off runs the original, unaltered. If a future build no longer matches what the correction describes, nothing is changed at all — the emulator runs exactly as downloaded, and the panel says the fix isn't running rather than letting the switch imply otherwise. Asked for upstream as Vita3K#4100.
shadPS4 gets a small correction at launch instead. It reads your Deck's sensor axes in the wrong order — SDL describes a gamepad's axes differently from a handheld's, and shadPS4 passes them straight through — so tilting your Deck worked while turning it did nothing.
The plugin loads a tiny library alongside the emulator that rotates the axes back. shadPS4 itself is the ordinary Flathub build, untouched and still updating normally. Asked for upstream as shadPS4#3871, and this goes away when it lands.
Xbox 360 files
Xenia works out what a file is by reading it, not by its name, so the extension matters less here than it does elsewhere. It runs:
.iso— a game disc image.xex— an extracted executable.zar— Xenia's own compressed disc image, which it can also create- Xbox Live Arcade titles, DLC and title updates, which are content packages with no extension at all — the filename is a long string of hex
That last one used to have nowhere to go, since everything here matches a game to an emulator by its extension. The plugin now reads the first few bytes instead, so an XBLA container can be added like any other game even though its name says nothing.
XBLA games start as the full version. Every Xbox Live Arcade title has a
trial mode, and Xenia runs them as trials unless told otherwise. Installing
Xenia from here sets it to report the full-version license, so the game's
"Unlock Full Game" option doesn't appear. Set Xenia's license_mask yourself
and your value is kept.
Unzip first. Xenia refuses .zip, .7z, .rar, .tar and .gz outright,
and XBLA titles are almost always distributed zipped.
- Send the zip to your Deck.
- Start adding it.
- Press Unpack this zip in the panel.
Inside is a folder like 58410954/000D0000/ holding one long-named file. That
file — the game — comes out named after the zip, ready to add. See
unpacking a zip.
You need a profile, once. Games save to a profile, and the first time Xenia starts without one it says so and offers to create it:
- Choose Create Profile with the controller.
- Type a gamertag with the on-screen keyboard (Steam + X).
From then on the plugin signs that profile in whenever a game starts, so no game asks you to sign in. Xenia itself wouldn't — it remembers who was signed in only when it's quit from its own menu, and a game closed from Steam never is.
Arcade ROM sets
Supermodel runs the Sega Model 3 board, and an arcade game for it isn't one
file. It's a set of forty-odd chip dumps, kept together in a .zip named after
the game. Supermodel opens the zip and reads the dumps out of it by name,
exactly as MAME does.
Leave it zipped. This is the one archive on your Deck that isn't a wrapper around a game. Unpacking it gives you a folder of files nothing can load, and takes away the one file that could be played. The panel knows the difference and doesn't offer Unpack this zip for a ROM set.
It also stops guessing. A ROM set used to be matched on whatever the first chip dump inside was called, which meant a racing game's set could look like a PlayStation image and get offered PlayStation cores.
It's now matched on .zip itself, which is what Supermodel, MAME and FinalBurn
Neo all declare. Since plenty of other cores claim .zip only because they
unpack archives, the ones that read a ROM set as the cartridge are sorted to
the front and preselected. The rest are still in the list if you want them.
Names come from Supermodel's own game list, so a set named for its board code is added under the game's real title — which also gives the artwork search something it can find.
Test and Service are the stick buttons
Push the left stick straight down until it clicks — the button usually called L3 — and that's Test. The right stick clicked in (R3) is Service.
This is pressing the sticks in, not moving them. Nothing happens if you tilt them.
Those two are the buttons inside a real cabinet's coin door. On this board they're not an operator's convenience — they're the only way into a game's own settings, and some games won't start without going there.
Some racers arrive configured as a linked cabinet and stop at CANCELLED / NETWORK BOARD NOT PRESENT. To fix that:
- Press the left stick in (Test). The test menu opens.
- Go to Game System — the right stick in (Service) moves through the menu.
- Change Link ID from Master to Single.
- Exit the menu.
Once per game, and then never again. The setting goes into the game's emulated NVRAM, under the emulator's own data, written when Supermodel exits and read at every start.
There's no launch argument or shortcut setting that can do it instead. Link ID is a setting on the arcade board, not an emulator option, and Supermodel models it as one. The only way to lose it is to clear the emulator's data from Reset, which deletes the NVRAM along with everything else — and then the menu steps above are your way back.
Only 63 games were ever made for the board, and it's demanding hardware to emulate. The racers are the heaviest of them.
A few emulators are marked as having unconfirmed launch arguments. They install the same way, but if a game opens the emulator without loading the game, edit the arguments under All registered emulators below.
Removing an emulator here leaves your saves and configuration alone, and games you've already added start working again the moment you reinstall it.
Emulators this plugin does not ship
The list above is fixed, and nothing outside it is linked to or named as a download here.
Anything else can still be set up for you by importing a small JSON file that describes it:
- Send the
.deckyemu.jsonover Transfer, or press Import a definition at the bottom of this tab to reach one already on your Deck. - Press Import.
It then behaves like any other entry — right system, right file extensions, working launch arguments, firmware rows that say what's missing.
A definition says how the emulator is obtained. It can name a Flathub application, a release to download, or say that you'll supply the binary yourself and point at it.
Which means you're trusting whoever wrote it. Before storing anything, the panel shows you what the definition will install and every directory it may write to, and asks you to confirm. A definition can't delete anything, download firmware, run a second binary, write outside the directories it declares, or replace a built-in emulator — but those bound what it can reach, not whether its author meant well. Read the file first; it's a few lines of plain text.
See emulator definitions for the format, a worked example, and what to check when one doesn't work.
Native ports
Some games have been rebuilt to run on your Deck directly, with no emulator. A port plays one game and needs the disc or cartridge dump you already own. It builds its own copy of the assets from that file the first time it runs.
They live under Ports, and these ship with the plugin. Unlike every other table on this page, the middle column is a game rather than a system — a port plays one game, and which one is the only thing that tells you what to supply. The Ports tab says it too, under each name.
| Port | Plays | Installed from |
|---|---|---|
| Dusklight | The Legend of Zelda: Twilight Princess | GitHub — TwilitRealm/dusklight |
| Ship of Harkinian | The Legend of Zelda: Ocarina of Time | GitHub — HarbourMasters/Shipwright |
| DevilutionX | Diablo | GitHub — diasurgical/DevilutionX |
| 2 Ship 2 Harkinian | The Legend of Zelda: Majora's Mask | GitHub — 2ship2harkinian/2Ship2Harkinian |
| Ghostship | Super Mario 64 | GitHub — HarbourMasters/Ghostship |
| Starship | Star Fox 64 | GitHub — HarbourMasters/Starship |
| SpaghettiKart | Mario Kart 64 | GitHub — HarbourMasters/SpaghettiKart |
| Lighthouse | Banjo-Kazooie | GitHub — IsleOPorts/Lighthouse |
| PaperBoat | Paper Mario | GitHub — HarbourMasters/PaperBoat |
A port behaves like everything else once installed. It's offered under Run with for a file it recognises, its game is filed under Ports rather than the system, and its saves get backed up with the rest.
A port that isn't in the table can still be added. Import a definition,
exactly as you would for an emulator: send a .deckyemu.json over Transfer
and press Import. One file can hold several, and each is checked on its own,
so one bad entry costs only itself. An imported one then behaves exactly like
the nine above, except that it's never marked as verified — nobody here has run
it.
Three things differ from an emulator:
- The first launch takes minutes and may ask you a question. It's building its own archive from your dump. The screen may stay black while it works.
- Its menu opens with Select+Start, because a port is a PC program whose menu wants a keyboard key and Game Mode has none.
- It plays one game. A port is only offered for a file that identifies as that game, and where the port publishes the dumps it accepts, a file that isn't one of them is named as such before you add it.
Removing an emulator
Press Remove on its row. That uninstalls it and forgets its registration.
Games you've already added keep their shortcuts and launcher scripts and start working again the moment you reinstall the emulator, so removing one isn't a decision about your library.
For a Flathub emulator the dialog offers Also delete its saves and configuration, off by default:
| Left off | Everything the emulator owns stays where it is — flatpak uninstall doesn't touch ~/.var/app/<id> — so reinstalling picks up exactly where you left off, memory cards and all |
| Turned on | Nothing is left behind, which is what a genuinely fresh install needs. An emulator that keeps its old configuration comes back with whatever state it was in, including a setup wizard you've already answered once |
You aren't offered the switch for an emulator installed from a GitHub release or one of your own, because their data lives in ordinary folders this doesn't remove.
A port is the exception, and removing one keeps its saves. The portable kind writes its saves and config next to its own binary rather than in a folder elsewhere — which is inside the directory removing it deletes. So what the entry declares as saves is left behind, and reinstalling the port finds them where it left them. Everything else goes: the binary, the archive it built from your dump, its logs.
Updating an emulator, or going back
Every emulator installed from the panel can be moved between published builds without leaving it, whether it came from Flathub or from the project's own releases.
For an emulator, press the branch button on its row under Emulators. For RetroArch, RetroArch version on its own tab.
Both open the same dialog: which build is installed, an Update when a newer one is published, and every other published build listed by date. Each row opens to show the whole of its description, the version, and how much it would download — switching build re-fetches the entire application, which for RetroArch is around 400MB.
Nothing updates on its own. An emulator moves when you ask it to.
The ones marked (GitHub)
RPCS3, Azahar, Vita3K and Xenia Canary publish no Flatpak, so the plugin downloads them from the projects' own release pages. That's what the (GitHub) next to their names means. They move between builds like the rest, with two differences.
Whether an update exists isn't checked when the tab opens. Finding out means asking each project's repository directly, one request per emulator, and a tab that did that every time you walked past it would be spending your connection on a question nobody asked.
So there's a Check for emulator updates button at the foot of the Emulators tab, and a Check for port updates at the foot of the Ports tab. Each asks about the list it sits under and counts only that list. Press it and the rows say update available where there is one, and the button tells you what it found.
Until you press it, the plugin doesn't claim either way. A row saying nothing means nobody has looked — not that the emulator is current.
They can't be held. A hold exists to stop something else moving an emulator, and nothing else on your Deck updates an AppImage this plugin downloaded. Staying on a build is simply not pressing update.
Choosing a build also holds it there, and that's the part worth
understanding. Holding stops anything moving it, not only this plugin — any
flatpak update on your device does, including whatever you press when you
update your Deck from Desktop Mode.
Without a hold the sequence is: a build breaks a game, you go back to one that works, you update your Deck a fortnight later, and the game breaks again with nothing connecting the two. The hold is what prevents that. It shows on the row as held, and you release it from the same dialog whenever you want updates again.
A held emulator receives no updates at all until you release it, security fixes included. That's the trade, and it's why the state is stated on the row rather than hidden in a dialog.
You aren't offered this for:
| Why | |
|---|---|
| A system-wide Flatpak | Root-owned, and the plugin has no way to answer a password prompt |
| RetroArch from a package or an AppImage | Neither was installed from here and neither has builds to move between |
| An emulator you registered yourself | The plugin didn't install it and doesn't know where it publishes |
For a Flathub build, the note on each row describes its packaging — "Restrict nvidia-cg-toolkit to x86_64" — not the emulator's own release notes, which live on the project's site. For a release build the row is the tag the project gave it, which is as much as a release listing carries.
Adding your own emulator
The Emulators tab has two lists:
| List | What it is |
|---|---|
| Ready-made emulators | The catalog — what the plugin knows how to install and set up |
| All registered emulators | Everything wired up for adding games, whichever list it came from, and where each one's system, file types and launch arguments are edited |
For anything the catalog doesn't cover, register a standalone emulator by hand
with Add an emulator. You need either a Flatpak application id or an
executable/AppImage path, plus the file extensions it handles and an argument
template where {rom} gets substituted.
The System field is the one that matters for artwork. Boxart lookup and the SteamGridDB release-era check both key on the libretro system name, so declaring it makes a custom emulator behave exactly like a core — same name cleanup, same boxart, same collection grouping.
Leave the system unset and games still launch, but artwork then depends entirely on SteamGridDB matching by title, with no era sanity check.
With at least one emulator registered, the plugin is fully usable without RetroArch installed at all.